
Technical SEO optimisation, sometimes associated with on-page (or on-site) SEO, is one of the 3 major families that improve a site’s natural search ranking. Technical optimisation is probably one of the most complex, though you have complete control over it — unlike off-site SEO. As its name suggests, it involves optimising your site “from the inside”, like on-site SEO, but focusing on purely technical aspects.
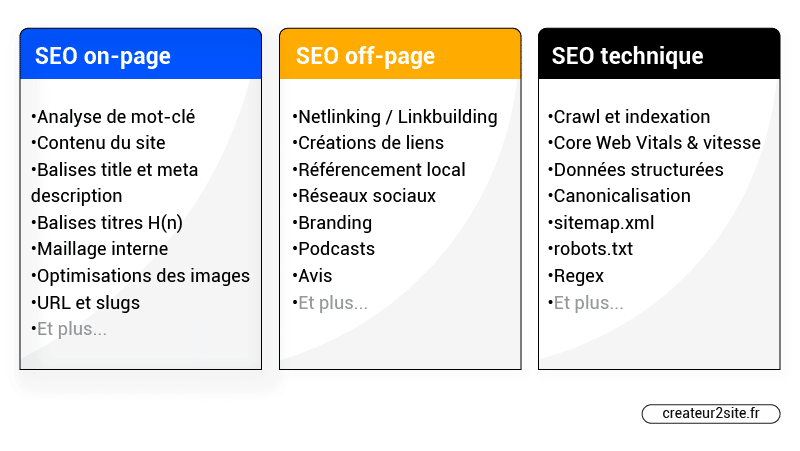
SEO can be divided into three categories: on-site (or on-page) SEO, off-page (or off-site) SEO, and technical SEO — sometimes grouped together with on-page SEO.
What is technical SEO?
Technical SEO refers to all the efforts made “inside the website” to improve its search engine rankings through purely technical aspects.
A wide range of possible technical optimisation techniques can be listed, such as:
- Crawl optimisation
- Schema markup / structured data
- Site speed & Core Web Vitals
- Sitemap.xml / Robots.txt
- …
Technical SEO vs on-page SEO vs off-site SEO
On-page SEO is something over which you have complete control, whereas this is not always the case for off-page SEO.
For most off-page optimisations (or almost all of them), you cannot know whether they will work, since you do not have full control over them (without cheating, at least).
Conversely, if you improve your site speed (technical SEO), add co-occurrences (on-page SEO) and so on, this falls under on-page SEO because you can make these changes directly on your website.
Technical SEO is often integrated into on-site SEO. This category includes all the technical aspects of on-page SEO. For example, optimising for search intent would fall under the non-technical aspect, whereas integrating structured data tags (schema markup) or optimising page crawlability falls under the technical aspect.
What is the impact of technical SEO?
Like all the major SEO optimisation families, if you neglect any one of them, it is likely that you will be unable to rank for a moderately competitive query.
However, while technical SEO is important, it is not strictly indispensable. Technical SEO is often viewed in the SEO world as the cherry on the cake.
While it is strongly advisable to carry out the simplest technical optimisations, it is better to spend less time on this area than on on-site and off-site. The ideal approach is to ensure you have solid on-site SEO, then sprinkle in some light technical SEO, and finally focus on off-site SEO.
The very technical side of technical SEO can be left until the very end.
What is crawling?
Crawl optimisation is the cornerstone of technical SEO. But what is crawling?
Crawlers — also called bots, robots, or spiders — are “programmes” that browse the web to find new pages making up this universe, and then index them (or not) in Google. They read the content of pages and follow the links found on them to discover more pages. This is how they discover pages on the web.
The crawl budget
Every site has a certain crawl budget — this budget is unique to each domain name, based on several criteria, with site popularity playing one of the biggest roles. Optimising how your pages are crawled leads to better natural search engine optimisation. There are many techniques for doing this. These can range from adding images to an article to improve indexation, all the way to blocking robots via robots.txt to optimise the crawl budget and/or improve site coherence. The subject is vast.
The sitemap.xml
A sitemap.xml tells crawlers about all the pages that make up your website. This makes the robots’ job easier and increases the chances that they will discover all your pages and index them in Google.
The robots.txt file
The robots.txt text file is used to give technical information to robots, such as a list of permissions and prohibitions. When a robot finds your page, the first thing it does is read your robots.txt file — this tells it whether it is authorised to index a given page or not.
For example, if you use WordPress, adding “Disallow: /wp-admin/” tells robots not to crawl this folder, which contains all the WordPress admin panel files. This folder allows you to manage your site via the admin panel — there is no reason to let robots index it and its files.
Are your pages crawled and indexed?
To quickly and simply check whether robots are crawling your pages and — following their crawl — indexing them in the search engine, you can consult your Google Search Console. Go to the “Coverage” report under the “Index” section:
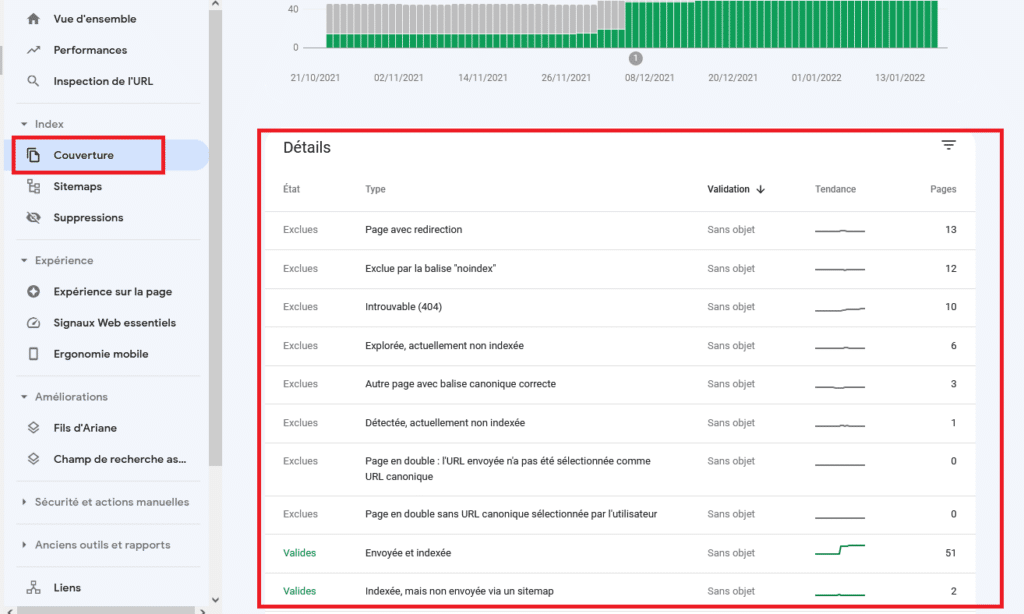
If you need more information, simply click on the item of interest to obtain full details.
You can also use the “URL Inspection” tool to see whether a robot has properly crawled a given page and whether it has been indexed:
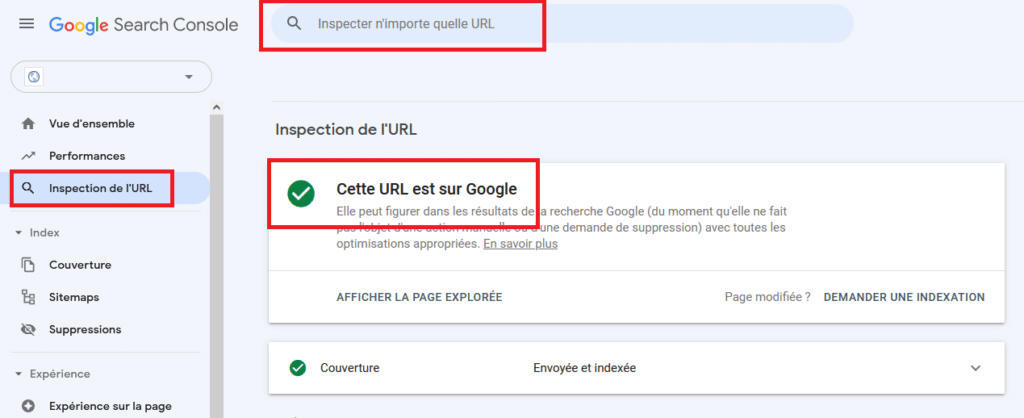
Note: a page can be crawled without being indexed, however it cannot be indexed without having first been crawled.
Verifying crawl and indexation without GSC
If you have not yet set up Google Search Console, install it. In any case, it is also possible to verify the crawl and indexation of your pages with various tools such as Semrush’s site audit report, or Ahrefs’ Audit to see pages that cannot be indexed and why. There are also more technical dedicated tools such as Botify, ScreamingFrog and many others.

The 5 basic principles of technical SEO
To begin, let us look at the most classic, simplest and quickest optimisations together. The advanced technical SEO sections will come at the end.
1. Create a robots.txt file
To create your robots.txt file, simply create a plain text file at the root of your site.
Example: https://my-site.com/robots.txt (and write it correctly)
If you use WordPress, it will be automatically generated upon installation; however you will need to modify it — for example using the Yoast SEO plugin.
Yoast SEO → Tools → File Editor
If you cannot see Yoast’s file editor, or if you are not using WordPress, you can modify and/or create your robots.txt via FTP (probably here: /www/your-site/public) at the root of your site.
Now that you have created your robots.txt, it is time to fill it in. Here is a step-by-step list:
- Find the URL of your sitemap — probably: your-domain-name/sitemap_index.xml
- Add these lines to your robots.txt:
Sitemap: https://thepathofyoursitemap/sitemap_index.xml
User-agent: * - If your site uses WordPress, you must add:
Disallow: /wp-admin/
Allow: /wp-admin/admin-ajax.php
While it is indeed possible to further optimise your robots.txt, the key is to have these elements in place (make sure to include the link to your sitemap index in your robots.txt). If you do not yet know what you are doing, that will come — there is nothing more to add for now.
2. Create a sitemap.xml
A sitemap will help optimise your crawl quotas (or crawl budget), as well as the indexation of your images — and because Google views pages listed in a sitemap as canonical suggestions.
If you use WordPress, I recommend Yoast SEO. Go to SEO > General Settings > Features > XML Sitemaps and click “Activate”.
If you use another CMS or another technology, I recommend researching the procedure for creating a sitemap. There is a detailed guide available for creating a sitemap.xml.
In any case, I advise against creating a sitemap manually or using technologies such as the sitemap generator at . Indeed, you would need to restart the process every time a new page is created (there are also many other factors to consider). The best solution is to ask a developer to create an automatic solution for your site if no tool exists for your situation.
Do not forget to submit your sitemap index to Google Search Console, as well as to Bing Webmaster Tools. You can also transfer your Google Search Console data to Bing Webmaster Tools to save time.
3. Duplicate URLs and the canonical tag
Avoiding duplicate URLs will make Google’s job easier. You should only allow access to one version of your URLs to prevent users or search engines from visiting the wrong URL (your non-“preferred” URL).
You must take letter case and separators into account. For example, the following URLs will load the same content, which means search engines could index all five as five separate pages.
- createur2site.fr/blog/
- www.createur2site.fr/blog/
- createur2site.fr/Blog/
- createur2site.fr/blog
- www.createur2site.fr/Blog/
To address this, you can set up redirects that will always point to the page you want — in this case createur2site.fr/blog/. Or simply implement a canonical tag that tells Google this URL is the original, while also choosing your primary domain name.
Want to know more? Consult our complete guide on canonical tags.
Choosing your preferred domain name
Your website is accessible both with “www” and without “www” before your domain name.
For example, if your domain name is mysite.com, users can access your site at both:
→ https://www.mysite.com
→ https://mysite.com
This is not problematic in terms of user experience. However, it is very bad for search engines.
Google will treat these 2 URLs as 2 different websites.
If you do not choose your preferred domain, you will encounter indexation issues, duplicate content issues, and what is known as cannibalisation (meaning your own content will compete with itself even though it is the same page). The crawl budget must also be taken into account.
How to fix it? It depends on the service you use. If you use Kinsta, for example, it is as simple as clicking a single button.
With or without www makes no difference — you simply need to choose. The trend is to remove the www. and in any case, if the user enters www, they will still find your site.
Implementing canonical tags
To implement canonical tags and have a single primary URL version, you must use this HTML code in your <head>:
<link rel=”canonical” href=”https://createur2site.fr/en/blog/” />
If you use WordPress:
Go to: Pages > (choose your page) > Edit
Then find the Yoast settings.
Enter your “original” URL here — for our example: https://createur2site.fr/en/blog/
Canonical tags also serve to prevent other types of URLs from being indexed, such as: example.com/product – example.com/product?color=red
These are called parameterised URLs and are a common cause of duplicate content, particularly on e-commerce sites with filtered navigation.
4. Page experience signals
Google takes into account several signals, collectively known as “page experience signals”, to evaluate the relevance of a site.

All the page experience signal elements can be found in Google Search Console under the “Page Experience” tab. This makes it very easy and accessible to see whether or not your site meets their criteria, and why.
Core Web Vitals
Core Web Vitals (Essential Web Signals in French) are user experience signals correlated with site loading speed. Core Web Vitals are part of Google’s Page Experience factors. These measurements include visual loading with Largest Contentful Paint (LCP), visual stability with Cumulative Layout Shift (CLS) and Total Blocking Time (TBT), among others.
In the logic of this article, it is fairly easy and quick to optimise these metrics by installing a few plugins if you use WordPress. Worth mentioning are WP Rocket, Perfmatters, Imagify and Kinsta. If, however, you want to optimise your CWV to the maximum, this will be more complex. It should also be noted that there are many articles on our site explaining in detail how to improve each metric. Start here: Improve your Core Web Vitals.
HTTPS
Once again, HTTPS is also part of Google’s page experience. It therefore also plays a role in optimising your search ranking. HTTPS is a good practice even if you think your site did not need it — as it prevents hackers from intercepting or modifying communications between a browser and a server.
Safe browsing
Google checks that your site does not contain malware or any other possible security issue that could harm your users.
Interstitial elements
An interstitial element is an element hidden within content or a page. This can be pop-ups that cover a page which users must interact with, and which could disturb the user — which is why it is included in the page experience.
Responsive design (mobile friendly)
To put it simply, responsive design means a page that is visually adapted to all devices — whether desktop (computer), mobile or tablet. Google checks this parameter and includes it as a ranking criterion in the page experience.
To verify whether your site meets these criteria, go to the “Mobile Usability” report in Google Search Console.
5. Open Graph tags
Open Graph tags allow the key information of a page to be displayed on social networks when a link points to a web page. This has no impact on Google’s side, but it is still part of technical SEO. Put more clearly, Open Graph tags allow a social network to display a title, description and image when a link is shared on its platform.

In code, this looks something like:
<html xmlns:og=”http://ogp.me/ns#”>
<head>
<title>Open Graph: Why Use Open Graph Tags?</title>
<meta property=”og:title” content=”Article on technical SEO and Open Graph tags” />
<meta property=”og:type” content=”article” />
<meta property=”og:url” content=”https://createur2site.fr/en/article/” />
<meta property=”og:image” content=”https://createur2site.fr/en/images/open-graph.jpg” />
<meta property=”og:site_name” content=”Web agency” />
</head>
It is also possible to use a plugin on WordPress — Yoast SEO, for example, handles Open Graph tags.
5 advanced technical SEO optimisations
Now that we have covered the classic technical SEO checklist, let us move on to advanced technical SEO. You might want to grab a coffee first!
Most of these optimisations — such as those related to CTR, bounce rate, or rich snippets — are only relevant if and only if your page is already on the first page of results and you want to climb to the top position on that first page. As mentioned earlier, technical SEO covers a good proportion of SEO optimisation — like the cherry on a cake.
1. Improving indexation and crawlability
There are many possibilities for improving the indexation of your pages, as well as different ways to optimise your crawl budget. Depending on the size of your site, this may not always be relevant.
Improving your crawl budget
Here are different methods for gaining crawl budget:
- Have a solid internal linking structure
- Have a fast site (not in terms of Core Web Vitals but in raw speed)
- Keep page depth to no more than 3 clicks (excluding semantic silos)
- Have a popular site in terms of backlinks (high DR, high BAS)
- Be present on Google Discover
- HTTP error codes 3xx, 4xx, 5xx
Another fairly little-known method is to use dynamic URLs for paginated pages rather than creating new URLs.
In other words, switch from this:
https://site.fr/seo-topics/page/2
to this:
https://site.fr/seo-topics?page=2
This way, Google spends less time re-crawling pages and more time discovering and indexing new content.
Improving indexation
It can be frustrating to see Google’s bots crawl your pages without agreeing to index them. There are many possible reasons. In general, Google will not index a page if, for some reason, it considers it spam:
- Your page contains no images, or not enough
- Your page’s content is detected as duplicate content — internal or external to your site
- The page does not have enough text
- The page is not popular
- The overall quality of the content
In any case, use Google Search Console to understand the problem more precisely. You can also submit a page in GSC for indexation.
2. Log analysis
Log analysis is a part of technical SEO that should not be overlooked. It allows you to check for 404 errors, 301 redirects, and identify whether a staging environment has been accidentally indexed, or whether an X-Robots-Tag in the HTTP header has crept in — which could lead your natural search engine ranking to disaster.
For this purpose, many SEO log analysis tools are available:
- OnCrawl.
- Botify.
- Screaming Frog Log File Analyzer.
- Seolyzer.
3. Internal linking
Internal linking can be very simple or very complex if you use advanced SEO techniques such as silos, hubs, siloing, semantic cocoons, etc. Visualising the architecture of your internal linking structure allows you to quickly determine how to optimise it and verify that no errors exist. For this, it is possible to use tools such as Visiblis and cocon.se.
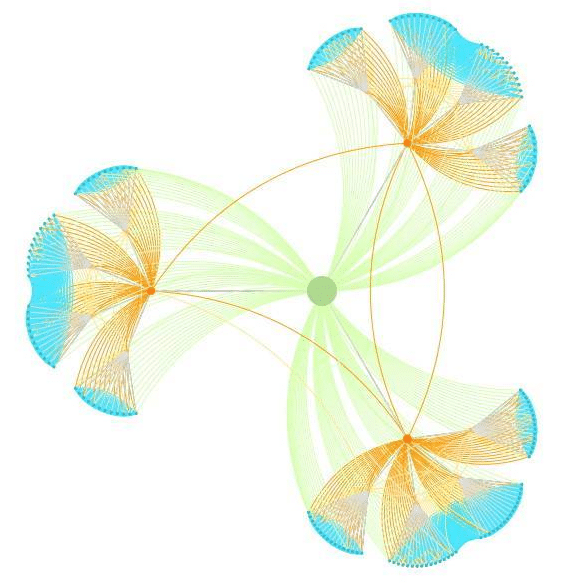
It is also entirely possible to create a semantic cocoon using the cocon.se tool and then track its implementation with the same tool.
Link obfuscation
Link obfuscation — also called link obscuring — consists of displaying a link to users but not to Google. This technique is not black hat, since the user is neither impacted nor deceived.
In fact, a link transmits “PageRank” or “link juice” — meaning it passes authority to the linked page. This juice does not diminish your authority, but it does transmit a portion of it to the page you are pointing to. In other words, it has no impact on the page that transmits it, but the receiving page gains authority. I will skip the finer details regarding link authority relative to semantic proximity and other nuances.
The problem is that the juice is divided among every link on a page. So, if your article is about chocolate cake, you add a link to your pear cake article and another to a Wikipedia article on the origin of chocolate cake, you divide the juice by 2 — whereas your pear cake page could have benefited from a stronger authority transfer.
Thus, obfuscation allows you to avoid degrading the user experience while optimising natural search engine ranking.
Google detects a URL via “href”, so a simple button is enough to hide it. It is also possible to use JavaScript and encode URLs in base 64 or fat32.
<button onclick=”window.open(‘https://link.fr/’, ‘_blank’);”>anchor text</button>
This technique can also be used to hide legal notices from Google, and any other link that is useless for it, in order to sculpt your PageRank — while still allowing users to access them as if they were normal links.
4. Optimise your site for Google’s algorithms
This is more of a tip than an on-site technical optimisation — but no matter. Google has various algorithms such as RankBrain, Learning to Rank, and many others.
Andrey Lipattsev revealed that links, content and RankBrain are among the 3 most important signals in Google’s search engine ranking factors.
How do you optimise your site for Google RankBrain?
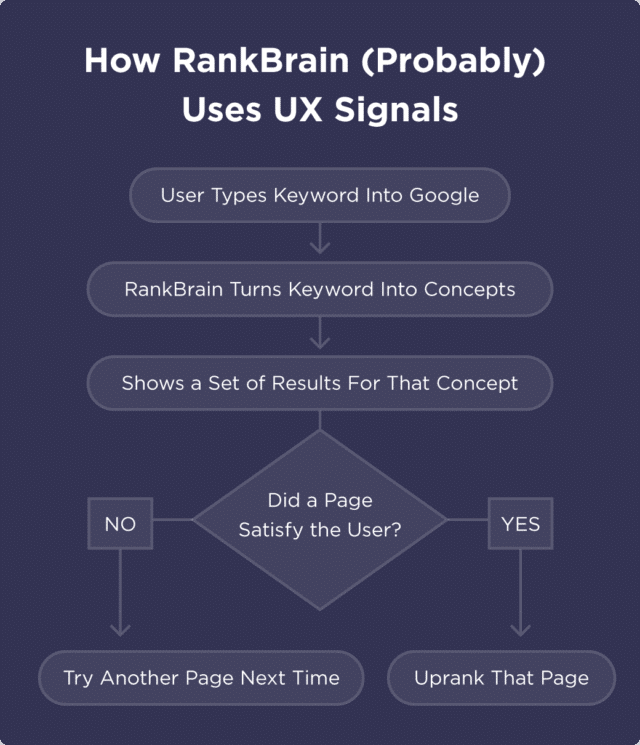
You will often hear that a user’s overall experience on a site can be a Google ranking factor. This is true — provided you correctly understand the why and the how.
We could also discuss the Learning to Rank algorithm, but I will focus mainly on what you need to improve, rather than explaining why. If you are interested, head to the chapter on Google’s algorithms.
First of all, improve your CTR
Google wants many people to click on your site in search results.
This tells Google:
“People love this result. Let’s push it to the top of the page to make it easier to find.”
But if people do not click on your result? Google will drop your site like a stone.
CTR is simply the number of clicks divided by the number of times your page was displayed — called impressions (clicks ÷ impressions = CTR). For example, if you record 5 clicks for 100 impressions, your CTR is 5%.
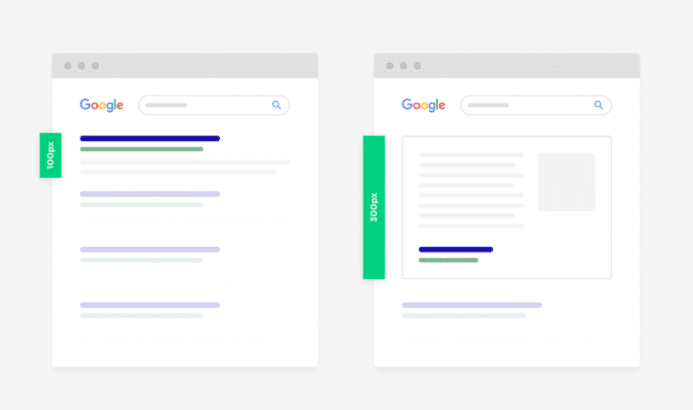
It would therefore be smart to optimise your title and meta description to attract users and encourage them to click, while also offering very good content. It is also worth noting the addition of rich snippets / Schema markup to take up more pixels on the SERP.
And finally, a compelling headline when the user arrives on the page, to make them want to read your article in full.
Bounce rate
Google wants its users to be happy and for you to properly answer the user’s query. While bounce rate is a highly debated ranking metric, here are a few tips nonetheless.
Logically speaking, if a user lands on your page and leaves after 3 seconds, can we say they were satisfied? In the majority of cases, probably not. But it is also possible that they were looking to answer a question and found the answer very quickly. In which case the page perfectly matched the search intent and that person was satisfied — even though they only spent a few seconds on the page.
In reality, this technical optimisation must be carried out within a framework where you have already determined the search intent. If, for example, your article should keep the user engaged for at least 10 minutes, your users should not be spending less than 10 minutes on your page. You need to match a certain average relative to your competitors.
Here are some optimisations that could keep users on your pages — provided you know what you are doing:
- Add videos / GIFs
- Images
- Text
- Links
Epic content with an epic site
If you produce superb content but without targeting keywords and without backlinks, your articles will indeed never be read or visible. But if you respect SEO criteria in addition to producing very good content that is visually appealing — no pop-ups, designed with UX in mind — you will rise above your competitors.
5. Rich snippets & Schema markup
Rich snippets, or featured snippets, are excerpts from an article or information linked to structured data that allow a page to appear as more than just a simple link on a SERP. Here is an example:
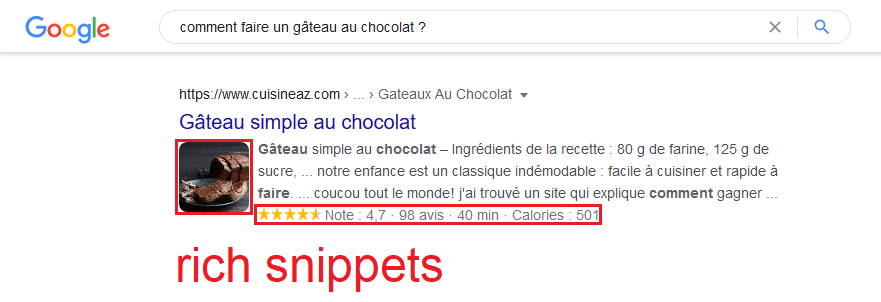
What you see are rich snippets, but featured snippets can appear naturally and/or with the addition of structured data, known as schema markup. You can also consult our complete guide on structured data.
Rich snippets
To obtain rich snippets without schema markup, it is possible to simply include bullet-point lists in your articles — which then appear in the SERP like this:
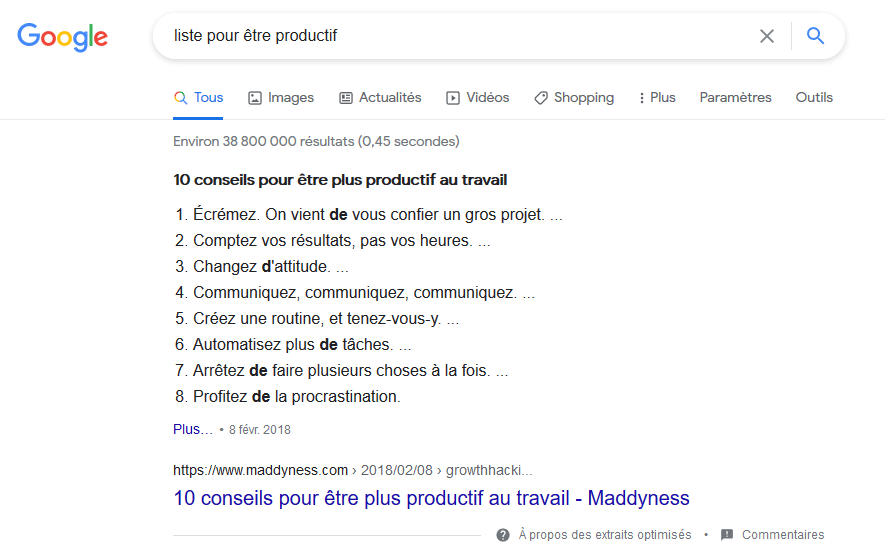
But it is also possible to obtain other rich snippets without touching structured data code. However, the possibilities are limited compared to what structured data can offer.
Schema markup / structured data
Structured data — known as schema markup in English — allows you to provide additional information to Google about your site as a whole, as well as various details about a specific page.
The most common information in structured data is:
- Your company name
- Its address
- Its social media accounts
- …
Here is what structured data looks like in JSON-LD format:
<head>
<title>Party Coffee Cake</title>
<script type=”application/ld+json”>
{
“@context”: “https://schema.org/”,
“@type”: “Recipe”,
“name”: “Party Coffee Cake”,
“author”: {
“@type”: “Person”,
“name”: “Mary Stone”
},
“datePublished”: “2018-03-10”,
“description”: “This coffee cake is awesome and perfect for parties.”,
“prepTime”: “PT20M”
}
</script>
</head>
There are thousands of different types of structured data, whether for displaying recipes in search results, event dates, videos, reviews, services, FAQs, and more.
There are several ways to implement it: with JSON-LD, in microdata, and with RDFa. JSON-LD is the method recommended by Google.
To get started, I recommend using and .