
SEO optimisation of images is what is called an SEO quick win. It is easy, simple, fast and effective. This guide brings together almost all the possible optimisations for your images. If your business relies on image ranking, also read my guide on advanced image optimisation.
This will help you avoid a situation like this:
Step 1: Fill in my alt tags.
Step 2: …
1. Name Your Images
Google tries to understand your image through the file name. So if you use images named IMG_562023.jpg, Google will not be able to understand your image as it would like. You need to make its job easier. For this reason, when you upload an image to your site, give it a descriptive name — without adding every possible keyword.
Examples:
Be descriptive: white-cat.jpg > cat.jpg
Be concise: white-cat.jpg > my-super-cute-little-white-cat-pepette.jpg
Do not stuff with keywords: white-cat.jpg > white-cat-whitecat-cat.jpg
Use hyphens between words: white-cat.jpg > white_cat.jpg
Do not include accents: white-cat-bike.jpg > white-cat-vélo.jpg
If the desired keyword you are optimising is a multi-word phrase, the words should be separated by a space character such as a hyphen (“-“), a period (“.”), a tilde (“~”) or an HTML escape code for a space (“%20”).
Despite being a reasonable choice, do not use underscores (“_”) for your spaces, as they are treated differently from spaces and will reduce your exact match evaluation against search queries.
2. Use Alternative Text (alt Tag)
Alternative text can be added to an image using the “ALT” attribute in the link. This text is read by search engines, so you can take advantage of it to add your keywords. Do not stuff your images with keywords — this should be done sparingly.
<img src=”https://site.com/white-cat.jpg” alt=”White cat riding a bike”>
Google uses the alt tag to contextualise the image and also uses this tag to rank you in Google Images.
Note: keywords placed in the ALT tag will replace the image if the browser cannot display it. If the image has no informational purpose (such as a background) you should not display an Alt attribute to avoid appearing spammy.
- Be descriptive. Use relevant keywords where appropriate.
- Be concise. Keep things short to avoid boring users.
- Be precise. Describe what is actually in the image.
- Avoid saying it is an image. Do not include “Image of…” or “Photo of…” in descriptions.
3. Add a Title, Caption and Description
The context and content of the page where the image is located, combined with a logical title, caption and description, provide search engines with additional information that can improve your natural SEO.
Here is an example:
<img src=”/media/elephant.jpg”
alt=”An elephant at sunset”>
<figcaption>An elephant at sunset</figcaption>
If you use WordPress, go to Media then choose the image you want to optimise. You can easily add an alt tag, description and caption to your images. Check that your theme takes into account the title, caption and alt entered in the media library when adding the image — this is not always the case.
4. Reduce the Weight of Your Images
Core Web Vitals are a Google ranking criterion. This includes, among other things, the optimisation of image loading speed.
Thus, optimising the weight and therefore the speed of your images will allow you to optimise your natural SEO.
Compress Your Images

There are many tools available online to compress images — generally this reduces the weight by more than 80% without deteriorating details for the human eye.
Imageoptim is the tool recommended by Google.
Resize Your Images
Do not use images that are too large if this brings no benefit. If you use a 4000×4000 image but display it at 750×750 on your page, upload it directly at 750×750. Indeed, the browser always has to load the image at its full size, so this is extremely important.
A good practice would also be to use responsive images. If a user is on a smartphone with a smaller display, even if your image is responsive the browser will still load the image at its large dimension. That is precisely why using “srcset” is so worthwhile.
This is a piece of HTML code that tells the browser to load different versions of an image for different screen resolutions.
Here is an example of the code:
<img src=”image.jpg” srcset=”image-medium.jpg 1000w, image-large.jpg 2000w”>
Note: Get into the habit of naming your images properly and resizing them to the correct size from the outset.
Use a Web-Friendly Image Format

To gain even more performance, it is important to serve your images in .webp format — a web-appropriate image format as opposed to .jpg or .png (.jpg being better).
If possible, even use the .svg format for your images — especially since Google indexes SVGs.
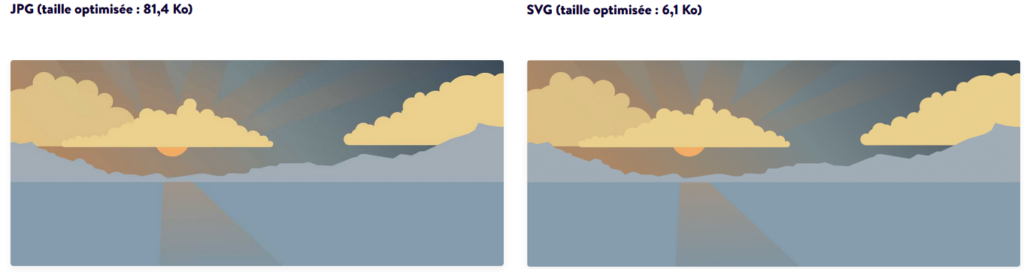
Here, SVG offers a file size reduction of 92.51%.
On the other hand, in certain cases, if the image is too detailed, SVG is not always cost-effective:
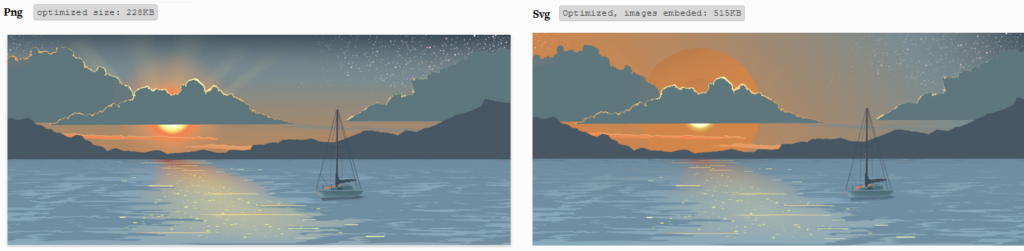
If you use WordPress, installing Imagify will allow you to resolve a large portion of your image performance problems.
Use a CDN
To optimise the speed of your images, it is strongly advised to use a (good) CDN to serve your images. Content Delivery Networks (CDNs) allow you to cache your files on a global network of servers. This allows the nearest server to be used for the visitor when they access your page. Thus, just like the other elements that make up a site, images will be loaded from the server closest to them, significantly increasing loading speed.
Note: depending on how your CDN is configured, this could negatively impact your SEO. For example, if images are hosted on a domain name different from yours. So if someone creates a backlink to the image, the CDN gets the juice. This can also cause other problems, such as having to redirect all image URLs if you change CDN.
Lazy Load, Lazy Loading
It is also possible to use lazy loading to optimise loading speed. Deferred loading allows images to be loaded and displayed when the user needs them. In other words, images are loaded progressively as you scroll down the page.
If you use WordPress, combine Imagify and WP Rocket to optimise the speed of your images. WP Rocket will, among other things, allow you to defer image loading (lazy load).
5. Use an Image Sitemap
You can give Google additional details about your images and provide the URL of those it might not discover otherwise by adding information to an image sitemap.
Here are the tags you can use in image sitemaps:

If you use WordPress and Yoast SEO, images will automatically be added to your sitemap. However, Yoast only includes the required tags <image:image> and <image:loc>. In other words, if you add captions to your images in WordPress, Yoast does not add them — you must therefore do this manually.
Google also specifies that image sitemaps can contain URLs from other domains, unlike standard sitemaps which apply cross-domain restrictions. This allows webmasters to use CDNs to host images while still considering SEO.
I do however want to point out that not all CDNs use a secondary domain name.
For example, Kinsta does not use a separate domain to display images.
« With the new Kinsta CDN powered by Cloudflare, your site will no longer need to serve static resources via a secondary CDN domain (site.com/image.jpg). Instead, all static resources will be cached and served via your site’s primary domain (site.com/image.jpg). ».
Food for thought.
6. Use Unique Images
Duplicate content is not appreciated by Google and this also applies to images. If you use images from stock photo banks or reproduce images from other articles, Google will not bother to index them.
Matt Cutts stated that duplicate images would not be indexed or would have less impact on your ranking. On the contrary, using original images would be seen as a quality signal.
In any case, this will not penalise your site — it simply will have no weight in improving your SEO, whereas using unique images could.
Moreover, using very high-quality images can earn you many natural backlinks! So make the most of it!